Introduction
Forex risk management is the discipline that determines whether a trader survives long enough to be profitable — or blows up their account in a matter of weeks. The foreign exchange market trades over $7.5 trillion per day, offering extraordinary opportunity, but also extraordinary risk. Most retail traders fail not because their strategy is wrong, but because they have no consistent, rules-based system to control how much capital they risk on each trade. The 2% Rule is the single most widely adopted framework for managing per-trade risk, and when combined with proper position sizing, stop-loss discipline, and leverage awareness, it forms the backbone of a professional-grade trading approach. In this article, you will learn exactly how the 2% Rule works, how to implement it in real trade scenarios, and the advanced risk management techniques that separate consistent traders from the majority who wash out.
Why Forex Risk Management Is the Foundation of Consistent Trading
Many new traders focus almost exclusively on finding a winning strategy — a reliable indicator setup, a news-trading edge, or a price action pattern. That focus isn’t wrong, but it’s incomplete. A great strategy without risk management is a sports car without brakes. You may go fast, but you will eventually crash.
The forex market is inherently probabilistic. Even the best-performing professional traders operate with win rates of 50–65%. What makes them profitable over time is not winning every trade — it’s ensuring that their winners are meaningfully larger than their losers, and that no single loss (or string of losses) can erase the account.
The Math of Ruin: Why Losses Hurt More Than Wins Help
Here is a mathematical reality that every forex trader must internalize:
Starting Account | Loss % | Account After Loss | Gain Needed to Recover |
$10,000 | 10% | $9,000 | 11.10% |
$10,000 | 25% | $7,500 | 33.30% |
$10,000 | 50% | $5,000 | 100.00% |
$10,000 | 75% | $2,500 | 300.00% |
A 50% drawdown requires a 100% gain just to return to breakeven. This asymmetry is why capital preservation takes absolute priority over chasing large gains. Risk management isn’t a defensive, timid approach — it is the mathematically correct one.
What Separates Retail Traders from Professionals
Institutional traders at hedge funds, prop firms, and banks operate under strict drawdown limits. Prop trading firms routinely cap daily losses at 2–5% of account equity, with a maximum total drawdown of 8–12% before a trader is cut off or required to reduce size. These aren’t arbitrary rules — they reflect decades of risk modeling. Retail traders who voluntarily apply these same principles give themselves a meaningful structural advantage over peers who trade without limits.
The 2% Rule Explained: What It Is and How It Works
The 2% Rule states that a trader should never risk more than 2% of their total trading account on any single trade. This rule was popularized by professional traders and risk managers as a practical threshold that allows a trader to survive long strings of consecutive losses without catastrophic account damage.
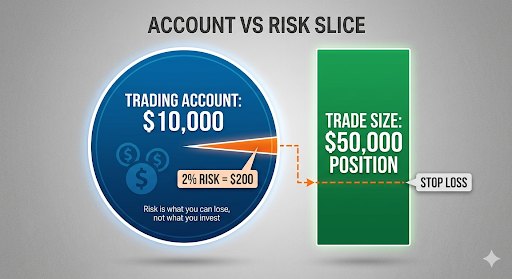
Here is the most important point many traders miss: the 2% refers to how much you can afford to lose, not how much you invest in the trade. You can enter a $50,000 position while only risking $200 of your $10,000 account — if your stop-loss is placed accordingly. This distinction is fundamental.
How to Calculate Your 2% Risk Per Trade
Formula
Maximum Risk Per Trade = Account Balance × 0.02
Example:
- Account balance: $5,000
- 2% risk: $5,000 × 0.02 = $100 maximum loss per trade
If you have a $25,000 account, your maximum risk per trade is $500. Every trade decision — your stop-loss distance and position size — must be calibrated so that if the stop is hit, you lose no more than this amount.
Position Sizing: Turning the 2% Rule Into Actual Lot Sizes
Position sizing is the mechanical execution of the 2% Rule. You cannot simply “feel” how much to trade — you must calculate it precisely before entering every position.
Step-by-step position sizing formula for forex:
Position Size (in lots) = Risk Amount ($) ÷ (Stop-Loss in Pips × Pip Value per Lot)
Worked Example (EUR/USD)
Variable | Value |
Account Balance | $10,000 |
Risk per Trade (2%) | $200 |
Stop-Loss Distance | 20 pips |
Pip Value (Standard Lot) | $10/pip |
Position Size | $200 ÷ (20 × $10) = 1.0 lot |
If your stop-loss is 50 pips instead:
Variable | Value |
Risk per Trade | $200 |
Stop-Loss Distance | 50 pips |
Position Size | $200 ÷ (50 × $10) = 0.40 lots |
Notice how a wider stop forces a smaller position size. This is exactly the discipline the 2% Rule enforces — your emotional desire to trade large is replaced by a mathematical constraint rooted in your actual stop placement.
When to Adjust Below 2%
While 2% is the standard upper limit, there are situations where experienced traders reduce this further:
- During drawdowns: If you are down 10% or more, consider dropping to 0.5–1% until you recover.
- High-volatility events: Major central bank decisions (FOMC, ECB) or non-farm payrolls create spike risk that can blow through stops. Many professional traders reduce size or avoid trading entirely around these events.
- New strategies: When testing a new setup on a live account, start at 0.5% until you have at least 20–30 live trades of data.
- Correlated positions: If you’re holding multiple positions that move together (e.g., EUR/USD and GBP/USD), your effective risk is higher than it appears. Reduce individual position size accordingly.
Risk-to-Reward Ratio: The Multiplier That Makes the 2% Rule Work
The 2% Rule controls your downside. The Risk-to-Reward (R:R) ratio determines whether limiting your losses actually leads to profitability. A minimum R:R of 1:2 — risking $1 to make $2 — is the standard benchmark most professional traders use as a filter for taking a trade.
Understanding Win Rate vs. R:R Ratio
This table illustrates how R:R ratio interacts with win rate to produce profitability:
Win Rate | R:R Ratio | Net Result per 10 Trades (risking $100/winning $200) |
50% | 1:2 | #ERROR! |
40% | 1:2 | #ERROR! |
33% | 1:2 | Approximately breakeven |
50% | 1:1 | $0 (breakeven before costs) |
50% | 1:3 | #ERROR! |
The critical insight: with a 1:2 R:R ratio, you can be wrong 60% of the time and still be profitable. This is why professional traders often describe their edge as primarily a risk management edge rather than a prediction edge.
Practical R:R Examples
Trade Setup — GBP/USD
- Entry: 1.2750
- Stop-Loss: 1.2720 (30 pips below — defines your risk)
- Target (1:2 R:R): 1.2810 (60 pips above)
- Target (1:3 R:R): 1.2840 (90 pips above)
If the trade is entered with $150 at risk (1.5% on a $10,000 account), the potential reward at 1:2 is $300, and at 1:3 is $450.
Stop-Loss Strategies: Protecting Capital Without Choking Trades
A stop-loss order is a non-negotiable element of every professional forex trade. Trading without a stop-loss is speculation without a safety net. However, where you place your stop is as important as having one at all — a stop placed too tightly will be triggered by normal market noise before your trade idea can develop.
Fixed Pip Stop vs. ATR-Based Stop
Stop Type | Method | Best Used When |
Fixed Pip Stop | Same pip distance on every trade (e.g., always 20 pips) | Scalping with very consistent volatility |
ATR-Based Stop | Stop = 1.5× to 2× Average True Range | Swing trading; adapts to market conditions |
Structure-Based Stop | Below/above key support or resistance | Price action and technical swing trading |
The Average True Range (ATR) method is widely favored by professional swing traders because it calibrates stop distance to actual current market volatility rather than an arbitrary fixed number. For example, if EUR/USD has a 14-period ATR of 80 pips, placing a stop 40 pips away means you are being stopped out by the normal daily range — not by a genuine change in market direction.
Structure-Based Stop Placement
Structure-based stops are placed just beyond a meaningful technical level — a swing high or low, a key support/resistance zone, or a consolidation boundary. The logic: if price breaks beyond that structural level, your trade thesis is invalidated regardless of time in the trade.
Example
- You buy EUR/USD at 1.0850, expecting a continuation of an uptrend.
- The most recent swing low is at 1.0810.
- You place your stop at 1.0800 — just below that structural level, giving it a small buffer against spikes.
- This defines your risk as 50 pips, and you calculate your position size accordingly using the 2% formula.
Common Stop-Loss Mistakes
- Moving stops further away after a trade moves against you — this destroys the entire premise of the 2% Rule.
- Setting stops at round numbers (e.g., exactly 1.0800) where institutional orders cluster and price frequently spikes through before reversing.
- Using the same stop distance regardless of volatility — a 20-pip stop makes sense for a quiet session but is suicidal during a news release.
- Not accounting for spreads — on pairs with a 2–3 pip spread, a 10-pip stop is effectively a 7–8 pip stop. Factor the spread into your calculation.
Understanding and Managing Leverage in Forex
Forex brokers offer leverage from 10:1 up to 500:1 in some jurisdictions (though European and U.S. regulations cap this significantly lower). Leverage allows you to control a large position with a small amount of capital — but it works in both directions with equal force.
How Leverage Amplifies Both Gains and Losses
Leverage | Account | Position Size | 1% Move Against You | % Account Lost |
10:1 | $10,000 | $100,000 | $1,000 | 10% |
50:1 | $10,000 | $500,000 | $5,000 | 50% |
100:1 | $10,000 | $1,000,000 | $10,000 | 100% (wiped) |
At 100:1 leverage, a 1% adverse move in the currency pair wipes your entire account. This is not a hypothetical — EUR/USD routinely moves 0.5–1.5% in a single trading session.
Choosing the Right Leverage Level
Professional recommendation: Use only as much leverage as your stop-loss and position sizing calculation requires to risk 2% of your account. In practice, this often means your effective leverage on any given trade is 5:1 to 15:1, regardless of the maximum leverage your broker offers.
Many experienced traders maintain a hard rule: they will never let their aggregate open position exposure exceed 10× their account equity, even if their broker allows 100×.
Correlation Risk: The Hidden Portfolio Danger
One of the most overlooked risks in forex is currency pair correlation. If you hold simultaneous long positions in EUR/USD and GBP/USD, you are not truly running two independent 2% risk trades — you are running one large position with double the effective exposure, because both pairs tend to move in the same direction against the USD.
High Positive Correlations (pairs tend to move together):
- EUR/USD and GBP/USD: ~0.85–0.90 correlation
- AUD/USD and NZD/USD: ~0.88–0.92 correlation
High Negative Correlations (pairs tend to move opposite):
- EUR/USD and USD/CHF: ~−0.85 to −0.90
- EUR/USD and USD/JPY: moderate negative correlation
Practical rule: If you are holding two highly correlated pairs in the same direction, treat them as a single position for risk calculation purposes and limit combined exposure to your standard 2% threshold. For less correlated pairs, you can allow simultaneous positions, but keep total open risk below 6% of account equity at any time.
Drawdown Management: Surviving the Inevitable Losing Streaks
Every trader — regardless of skill level — experiences losing streaks. Statistically, even a strategy with a 60% win rate will produce runs of 5, 6, or 7 consecutive losses with some regularity. The question is not whether you will face a drawdown, but whether you have the rules to survive it.
Maximum Drawdown Limits
Establish a maximum drawdown threshold — a point at which you stop trading, review your approach, and potentially reduce position size.
Drawdown Level | Recommended Action |
−5% from peak | Review recent trades; check for pattern changes |
−10% from peak | Reduce risk to 1% per trade until recovered |
−15% from peak | Stop live trading; full strategy review; demo until restored |
−20% from peak | Consider that strategy may no longer have edge; rebuild |
Scaling Back After Losses
A common professional technique is progressive position reduction during drawdowns. Rather than continuing to trade at full size while in a hole, reduce to half-size after a 10% drawdown. This limits further damage while keeping you active and in practice. When you recover half of the lost ground, restore to full size.
Advanced Pro Tips for Forex Risk Management
Keep a Trading Journal
A trading journal is one of the most powerful risk management tools available — and one of the least used. Record every trade with: entry rationale, pair and timeframe, entry/exit price, stop and target, actual outcome, and a post-trade emotional note. After 50–100 trades, patterns emerge that no amount of intuitive self-assessment will surface: certain session times where you consistently underperform, pairs where your edge doesn’t hold, or emotional states (after a big win, after a loss) where your decision quality degrades.
Avoid Overtrading
Overtrading — entering positions out of boredom, frustration, or the desire to “make back” a loss — is one of the fastest ways to destroy an account. Professional traders are highly selective. Many place fewer than 5–10 trades per week in a deliberate, rules-based way. Quality of setups matters far more than volume of trades.
A practical safeguard: set a maximum daily trade limit (e.g., no more than 3 trades per day) and a maximum daily loss limit (e.g., if you lose 3% on a given day, close your platform and stop for the day).
Use a Risk-Per-Week or Risk-Per-Month Cap
In addition to per-trade limits, apply a weekly or monthly aggregate risk cap. For example:
- Weekly cap: No more than 6% of account at risk across all trades in a given week.
- Monthly cap: If drawdown exceeds 10% in a calendar month, switch to demo until the next month begins.
These macro-level controls prevent a single bad week from compounding into a catastrophic month.
Separate Your Trading Capital
Never trade with money you cannot afford to lose — this is a regulatory disclosure that is also genuinely sound financial advice. Maintain a dedicated trading account funded with purely discretionary capital. Mixing trading capital with emergency savings or living expenses creates psychological pressure that is incompatible with disciplined, unemotional risk management.
Forex Risk Management Tools and Calculators
Tool | Purpose |
Position Size Calculator | Converts your 2% risk amount and stop-loss distance into an exact lot size |
ATR Indicator | Measures volatility to inform intelligent stop placement |
Correlation Matrix | Shows real-time correlation coefficients between pairs |
Trading Journal Software (e.g., Edgewonk, TraderVue) | Tracks all trades, performance stats, and emotional patterns |
Risk/Reward Planner | Lets you draw stops and targets on charts to visualize R:R before entry |
Most reputable charting platforms (TradingView, MT4/MT5) have built-in position sizing tools or third-party add-ons that automate the 2% Rule calculation. Using these removes human error from the process and enforces discipline mechanically.
Conclusion
Forex risk management is not a topic that sits alongside your trading strategy — it is the foundation your strategy stands on. The 2% Rule provides a simple, battle-tested framework for ensuring that no single trade can do material damage to your account. But its power only materializes when paired with correct position sizing, logical stop-loss placement, favorable risk-to-reward ratios, awareness of leverage, and the psychological discipline to follow the rules even when it is uncomfortable.
The traders who survive and thrive in forex markets over years and decades are not the ones with the most sophisticated entry signals — they are the ones who treat capital preservation as a sacred obligation and let their edge play out over hundreds of trades, protected at every step by disciplined risk management.
Key actions to take today:
- Calculate your 2% risk threshold for your current account size.
- Review your last 10 trades — did you adhere to a consistent R:R minimum of 1:2?
- Set up a position size calculator in your trading platform so it becomes automatic.
- Start a trading journal this week, even if only in a simple spreadsheet.
👉 Read next: What Is the 3-5-7 Rule in Trading and How to Use It — a complete breakdown of how this advanced risk framework works, with step-by-step implementation guidance for traders at every level.